Session 17: Fruit Catching Game – Part 2
Making the Monkey Move
Now it’s time to write the scripts for the Monkey sprite. Let’s begin!
Now let’s open the saved file.
- Open PictoBlox and click File in the menu bar.
- Click on Open and search for saved file Catch the Fruit.

Controlling the Movements Using Quarky
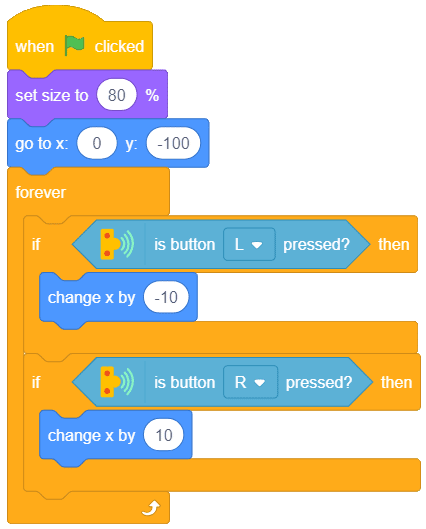
The script for controlling the sprite is almost the same as the script we made for making Tobi move in the previous activity. We only need to add the following two blocks between the when flag clicked block and the forever block:
- set size to () % block from the Looks palette. We’re using this block to reduce the size of the sprite to “80%” of the original size.
- go to x: () y: () block. We’re using it to fix the position of the sprite at the beginning of the game.
Below is the complete script:
Sensing and Catching the Fruits
Follow the steps below to sense the fruits and accordingly track the score:
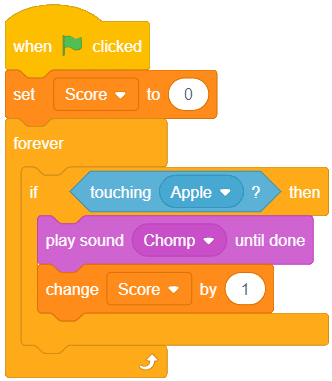
- Let’s start with sensing the Apple clone first. For that, we’re going to use an if block and a touching () ? block. First, drop an if block into the scripting area. Then, drop a touching () ? block inside its space and select “Apple” from the drop-down.
- Go to the Sound palette and drop a play sound () until done block inside the if block. Select “Chomp” from the drop-down. Now, it’s time for the most important thing – tracking the score. Every time the Monkey catches an Apple, the score should increase. To keep track, we’re going to create a variable.
- Go to the Variables palette and make a new variable named Score by clicking the Make a Variable.
- Drop a change () by () block from the Variables palette below the play sound () until done block. “Score” is selected as the default option in the first drop-down. Write “1” in the second space.
- Drop a forever block above the if block.
- Add a set () to () above the forever block to start the game with zero. “Score” is selected as the default option in the first drop-down. Write “0” in the second space.
- Finally, add a when flag clicked block to complete the script.
- Now, connect Quarky to PictoBlox as explained in the previous activity, and enjoy your game!
Save the file again by clicking Save icon on the menu bar if you are using a Mobile or you can go to File>save if you are on a Desktop.
Now your code is complete.
Enjoy the game!
Assignment
Before you move on to the next lesson, a small assignment awaits you!
You must upload the PictoBlox program you created in this activity to the website. Submitting the assignment is a must in order to receive the certificate after completing the course.
Follow the steps below to upload your assignment:
- Click on Choose File.
- Select the image from the pop-up window that opens up.
- Once the image is selected, click on Upload Assignment.

Good luck!