Session 10: Dice Roll with Quarky
Let’s come to play with dice on Quarky
Dice Roll with Quarky – Overview
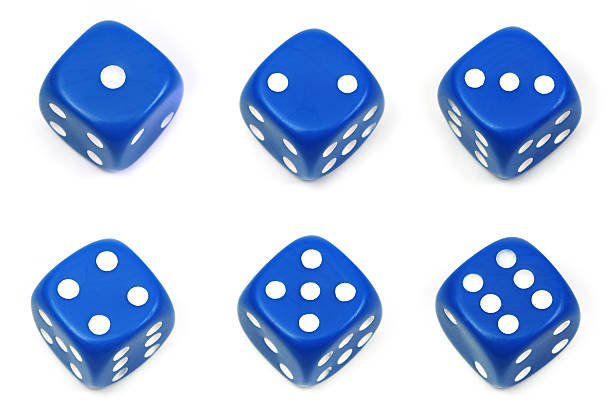
A die (plural “dice”) is a solid with markings on each of its faces which are usually all the same shape. They are used for generating random numbers, commonly as part of tabletop games like Ludo. The dice can be “rolled” by throwing it in the air and allowing it to come to rest on one of its faces. The most common type of dice is a six-sided cube with the numbers 1-6 placed on the faces. The value of the roll is indicated by the number of “spots” shown on the top. Every time a cubical die or dice is rolled, there are six possibilities of obtaining numbers. For example, if a cubical dice is rolled it has six possible outcomes: {1, 2, 3, 4, 5, 6}, as shown in the image below.
Just as we can generate random numbers from dice, the same way we can generate random numbers in Pictoblox using pick random () to () block from operators palette and build our own Dice game with Quarky.

Before directly jumping into the activity, let’s first understand how to generate a random number in PictoBlox?
The pick random () to () block is an Operators block and a Reporter block (Reporter block returns a value). The block returns a pseudorandom number ranging from the first given number to the second, including both endpoints. If both numbers are integers, the number returned will also be an integer. For example, if a 1 and a 3 were the bounds, the block might return either a 1, 2, or 3.
Activity – Making a Dice Roll with Quarky
The logic for this game is simple – if we press the left switch, L, a random number will be generated on Quarky LED display for player 1. If we press the right switch R, then a random number will be generated on the Quarky LED display for player 2.
That’s it! Now, let’s get started.
- In this game, we will make a dice roll for 2 players.
- The dice will be rolled for player 1 when Button L is pressed.
- Green dice roll for player 1 which shows a random number between 1 to 6 on the LED display (The number will be displayed in green color).
- The dice will be rolled for player 2 when Button R is pressed.
- Whereas Red dice roll for player 2 which shows a random number between 1 to 6 on the LED display (The number will be displayed in red color).
Let’s Code!

Follow the steps below to make the script:
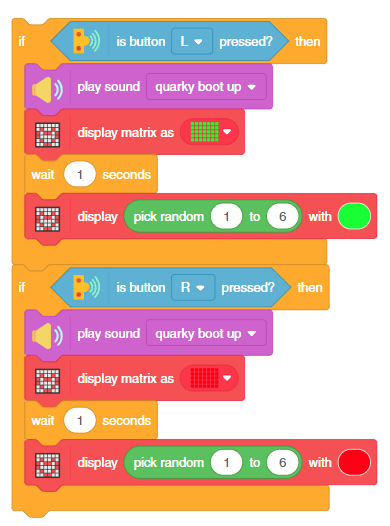
- Go to the Sensors palette and add a is button () pressed ? block into the scripting area. The button, L, is set as the default option.
- To check if L is pressed, we’ll use an if block. Go to the Control palette and drop an if block into the scripting area. Drop the is button () pressed ? block in the white space of the if block.
- Go to the Sound palette and drop a play sound () until done block inside the if block. Select “quarky boot up” from the drop-down.
- Add a display matrix as () block from the Display palette below the play sound () until done block. Draw a green-colored Matrix.
- Next, add a delay of 1 second using the wait () seconds block.
- Go to the Display extension and add a display () with () block into the scripting area. In the space add pick random () to () block from the Operator palette. Then, set the color of the LED to green-color (you can always choose the color of your choice) from the drop-down and this will display generated random numbers in green color.

- However, to check if R is pressed, we will duplicate the whole if block and snap it together. We will change the following:
- Change the button to R.
- Change the LED colors to Red.
- Add a forever block around the entire script.
- Add a when flag clicked block from the Events palette above the forever block to add the finishing touch.

Finally, click the green flag to run the script.
Assignment
Before you move on to the next lesson, a small assignment awaits you!
You must upload the PictoBlox program you created in this activity to the website. Submitting the assignment is a must in order to receive the certificate after completing the course.
Follow the steps below to upload your assignment:
Good luck!