Lesson 1,
Topic 1
In Progress
Activity: Making Face Filter
Face Filter Overview
- Many of you must have used face filters like the age filter on Snapchat or Blossom filter on Instagram. But have you ever wondered, how these filters recognize our faces ? we will learn how face filters work by making a hands-on project, that lets you choose a filter among the ones displayed on the screen and apply it to your face.
Let’s Code!
The code is pretty simple, let’s get straight into it, follow the below steps:
- Open Pictoblox and choose the Python (beta) coding interface.
- Click on Choose a Sprite button (bottom right corner) and add the Face Filter sprite to the environment.
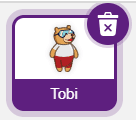
- Delete the Tobi sprite by clicking on the cross button (top right corner).
- Now, select the Face Filters.py file from the Project Files section (Left hand side) and by default, the sprite object will be initiated in the scripting area as follows:
sprite = Sprite('Face Filters') - Now create an object named fd to get access to the Face Detection extension and its methods/functions.
fd = FaceDetection() - Similarly, create an object named pen to get access to the Pen extension and its methods/functions.
pen = Pen() - Next, we will use various face detection functions -:
- video([1], [2]): To turn on the video. This function takes in two parameters. The parameter [1] is for switching on/off the video and the parameter [2] is for the amount of transparency in the video, 0 to 100 %
- disableblox(): To disable the bounding box
- setthreshold([1]): To set the threshold/confidence. It takes in one parameter. This parameter decides the threshold/confidence with which a face gets detected, 0 to 100%. We can use these functions as methods of the face detection object (fd) that we have created. Add the following code to the script:
fd.video("on", 0) # to turn on video with 0% transparency
fd.disablebox() # to disable bounding box
fd.setthreshold(0.4) # to set the threshold at 0.4
- Now, for the next part, we want to run our code continuously, hence we use a while loop such that the code keeps running continuously, until we stop it.
while True: - Inside this loop we add the following two functions:
- fd.analysecamera(): to analyse the video from the camera, on PictoBlox stage
- pen.clear(): to clear any pen markings from the previous run of the code.
while True:
  fd.analysecamera()
  pen.clear()
- Now we check, whether one or more faces are being detected on the camera or not; using an if-condition. We use the count() function from the face detection extension for this. The count() function returns, the number of faces detected on the stage.Also, we do not want sprite to say anything, when one or more faces are detected, hence we add a blank statement for sprite to say as: sprite.say(“”). This would also delete any other statement which was previously appearing.
while 1: fd.analysecamera() pen.clear() if fd.count() > 0: sprite.say("") - Now, we will add a for loop, to apply filter on each and every face detected by the camera. For this, we use the range(start, stop, step) function in python, where we choose:
- start = 1
- stop = fd.count() + 1, we want to iterate through all the we add ‘+ 1’ because the last entry is not iterated
- step defaults to 1, so we don’t need to add this parameter
while 1:
  fd.analysecamera()
  pen.clear()

  if fd.count() > 0:
    sprite.say("")
    for i in range(1, fd.count()+1):
- Now, we will add code for calculating the difference between the two face landmarks, “right eye” and “left eye”, along both the x-axis (dx) and y-axis (dy).For this we use the functions landmarksx([1], [2]) and landmarksy([1], [2]) for x and y axes respectively. For both of these functions, the parameter [1] denotes the face number, and parameter [2] denotes the landmark:
dx = float(fd.landmarksx(i, "right eye")) - float(fd.landmarksx(i, "left eye"))
dy = float(fd.landmarksy(i, "right eye")) - float(fd.landmarksy(i, "left eye"))
Also, both these functions return string, hence in order to subtract the position of landmark-1 from landmark-2, we need to convert them to type float, using the float() function.
- Now, that we have calculated dx and dy, we can use them to calculate the angle of tilt (Angle) of the face that is detected, using the following functions in the math library:
- math.atan2(dx, dy) – This function calculates the angle of tilt in ‘radians’
- math.degrees() – This function converts the unit of angle calculated from ‘radians’ to ‘degrees’
Angle = math.degrees(math.atan2(dx, dy))
- Now, we will set various properties of the Face Filters sprite, using the respective sprite functions:
- setx(): To set the x-position of the sprite
- sety(): To set the y-position of the sprite
- setsize(): To set the size of sprite
- setdirection(): To set the angle of sprite
sprite.setx(fd.x(i))
sprite.sety(fd.y(i))
sprite.setsize(fd.width(i))
sprite.setdirection(Angle)
- Finally, we use the stamp() function from the pen extension to finally implement the tilting of sprite on the stage. The entire if-condition (for more than 0 face detected) now looks as follows:
if fd.count() > 0: sprite.say("") for i in range(1, fd.count()+1): dx = float(fd.landmarksx(i, "right eye")) - float(fd.landmarksx(i, "left eye")) dy = float(fd.landmarksy(i, "right eye")) - float(fd.landmarksy(i, "left eye")) Angle = math.degrees(math.atan2(dx, dy)) sprite.setx(fd.x(i)) sprite.sety(fd.y(i)) sprite.setsize(fd.width(i)) sprite.setdirection(Angle) pen.stamp() - If not even one face is detected, then the sprite must say “No Face Detected”.
else: sprite.say("No Face Detected") - The entire code will be as follows:
sprite = Sprite('Face Filters')
import math

fd = FaceDetection()

pen = Pen()

fd.video("on")
fd.disablebox()
fd.setthreshold(0.4)

while 1:
  fd.analysecamera()
  pen.clear()

  if fd.count() > 0:
    sprite.say("")
    for i in range(1, fd.count()+1):

      dx = float(fd.landmarksx(i, "right eye")) - float(fd.landmarksx(i, "left eye"))
      dy = float(fd.landmarksy(i, "right eye")) - float(fd.landmarksy(i, "left eye"))
      Angle = math.degrees(math.atan2(dx, dy))
      sprite.setx(fd.x(i))
      sprite.sety(fd.y(i))
      sprite.setsize(fd.width(i))
      sprite.setdirection(Angle)

      pen.stamp()

  else:
    sprite.say("No Face Detected")
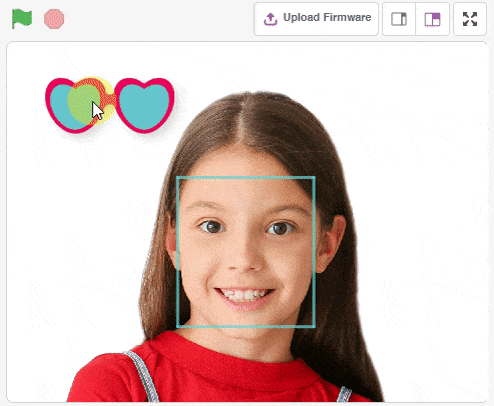
Output of the Code

Assignment
Before you move on to the next lesson, a small assignment awaits you!
You must upload the PictoBlox program you created in this activity to the website. Submitting the assignment is a must in order to receive the certificate after completing the course.
Follow the steps below to upload your assignment:
- Click on Browse.
- Search and Select your saved Project file(.sb3) and Click Open.
- Click on Upload to submit the assignment.
Good Luck!

The file type allowed is the SB3 file generated from the PictoBlox program. The maximum file size allowed is 5 MB.