Lesson 1,
Topic 1
In Progress
Logic of a Line Follower Robot
Making a Line Follower Robot – Overview
We now know all about line following robots – what they are and why they’re useful. Now, it’s time to make one of our own!
We’ll first lay out the track, understand the logic, and then make a script in PictoBlox to watch it in action. Let’s begin.
Laying Out the Track
Place the track on the ground.

You will notice 3 perpendicular black lines on the track. We will use these in upcoming lessons as checkpoints.
Understanding the Logic
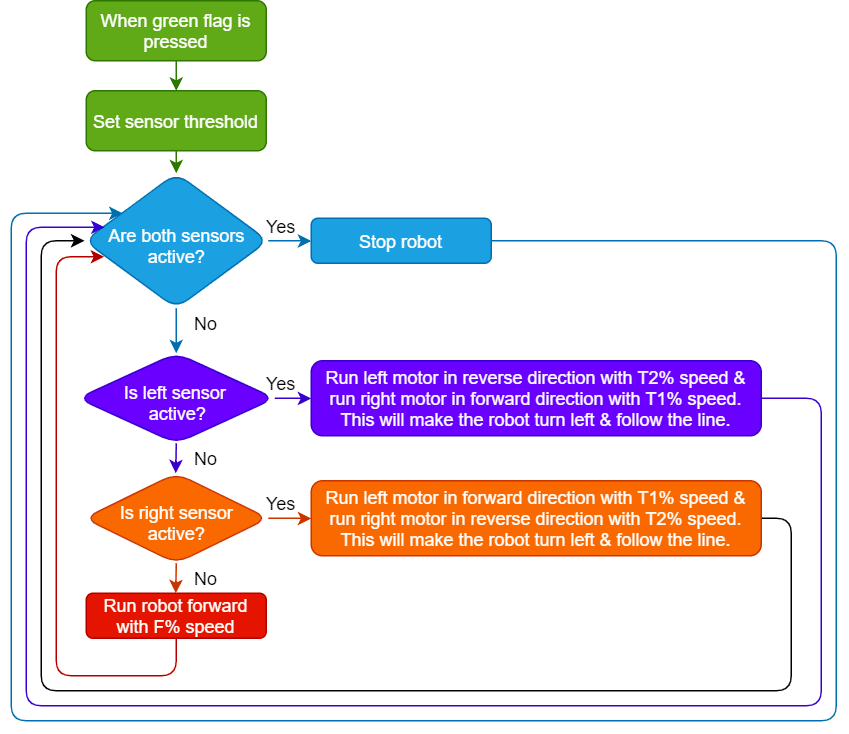
The logic behind the working of a line-following robot is simple:
- First, we will set the left and right IR sensor threshold.
- If both the sensors are active, it means that the robot is at a crossroad and therefore must stop.
- If only the left sensor is active, this means that the robot is drifting towards its right and we need to bring it back on track. Therefore, we must make it move a little towards the left.
- If only the right sensor is active, this means that the robot is drifting towards its left. Therefore, we must make it move a little towards the right.
- If none of the sensors is active, it means that the black line is in between them and the robot is going in the right direction. Therefore, it should keep moving forward.
- Repeat steps 2-5.
There are 3 important things we will use in a line following robot:
- F: The speed with which the robot will move forward when it has not detected a black line.
- T1 & T2: When the robot is following the line and if one of the sensors say the left one, detects the black line, then the robot is off track and it has to turn left in order to get back on the track. And we know how to turn the robot left. The left motor moves backward and the right moves forward. But if both are moving at the same speed, then the robot motion will become jerky and inefficient. Hence we will have two speeds for turning T1 and T2, where
- T1 will be the speed with which the motor will move forward and
- T2 will be the speed with which the motor will move backward.
- We will have to set F, T1, and T2 during the programming and calibrate it for effective line following.
Now, let’s make the script for Quarky based on this logic.