Lesson 1,
Topic 1
In Progress
Activity: Tracking a Sprite’s Position Using Variables
In this activity, we will track the change in Tobi’s position using the up, left, down, and right arrow keys on the keyboard. We will track his X and Y positions using variables.
Follow the steps below:
- Open PictoBlox and create a New File.
- Select the coding environment as Block Coding.
- Create two variables X and Y. We’ll use them for Tobi X and Y positions respectively
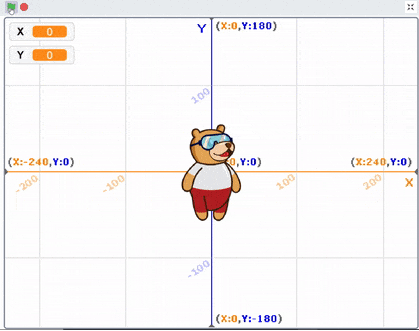
- Change the background to Xy- Grid to visualize the position.
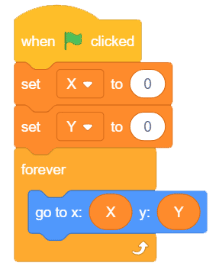
- Add the when flag clicked block to start the script.
- Next, set the X and Y positions as 0 by setting the X and Y variables as 0 using the set () to () block.
- Now, add a forever block below the when flag clicked block.
- Then, from the Motion palette, add a go to x:() y:() block and drag and drop the X and Y variable blocks inside it as shown. This will set Tobi’s position to the current value of X and Y.
 Now, to make Tobi move around and track his position, we need to change the values of X and Y. How do we do that? Here’s how:
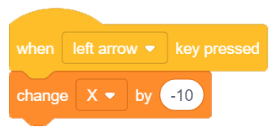
 - To move left, we will change X by -10 whenever the left key is pressed. Add a when () key pressed block from the Events palette and change X by -10 by using a change () by () block.
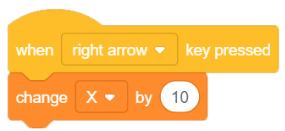
- To move right, we will change X by 10 whenever the right key is pressed. Repeat the above step and select the right arrow key from the drop-down of the hat block and change X by 10 in the change () by () block.
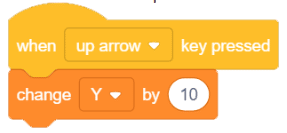
- To move up, we will change Y by 10 whenever the up key is pressed.
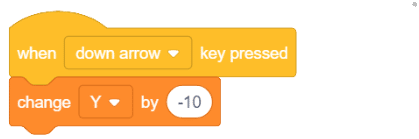
- For down, we will change Y by -10 whenever the down key is pressed
- Now run the script and enjoy it.
- Save the file with the name Tracking a Sprite’s Position Using Variables.
Assignment
Before you move on to the next lesson, a small assignment awaits you!
You must upload the PictoBlox program you created in this activity to the website. Submitting the assignment is a must in order to receive the certificate after completing the course.
Follow the steps below to upload your assignment:
- Click on Browse.
- Search and Select your saved Project file(.sb3) and Click Open.
- Click on Upload to submit the assignment.

The file type allowed is the SB3 file generated from the PictoBlox program. The maximum file size allowed is 5 MB.
Good luck!